Schedule Settings (General, Appt. Details, Display, Colors)
Navigation Menu (Map, Sidebar, Route Packet)
Setting Up Your Schedule
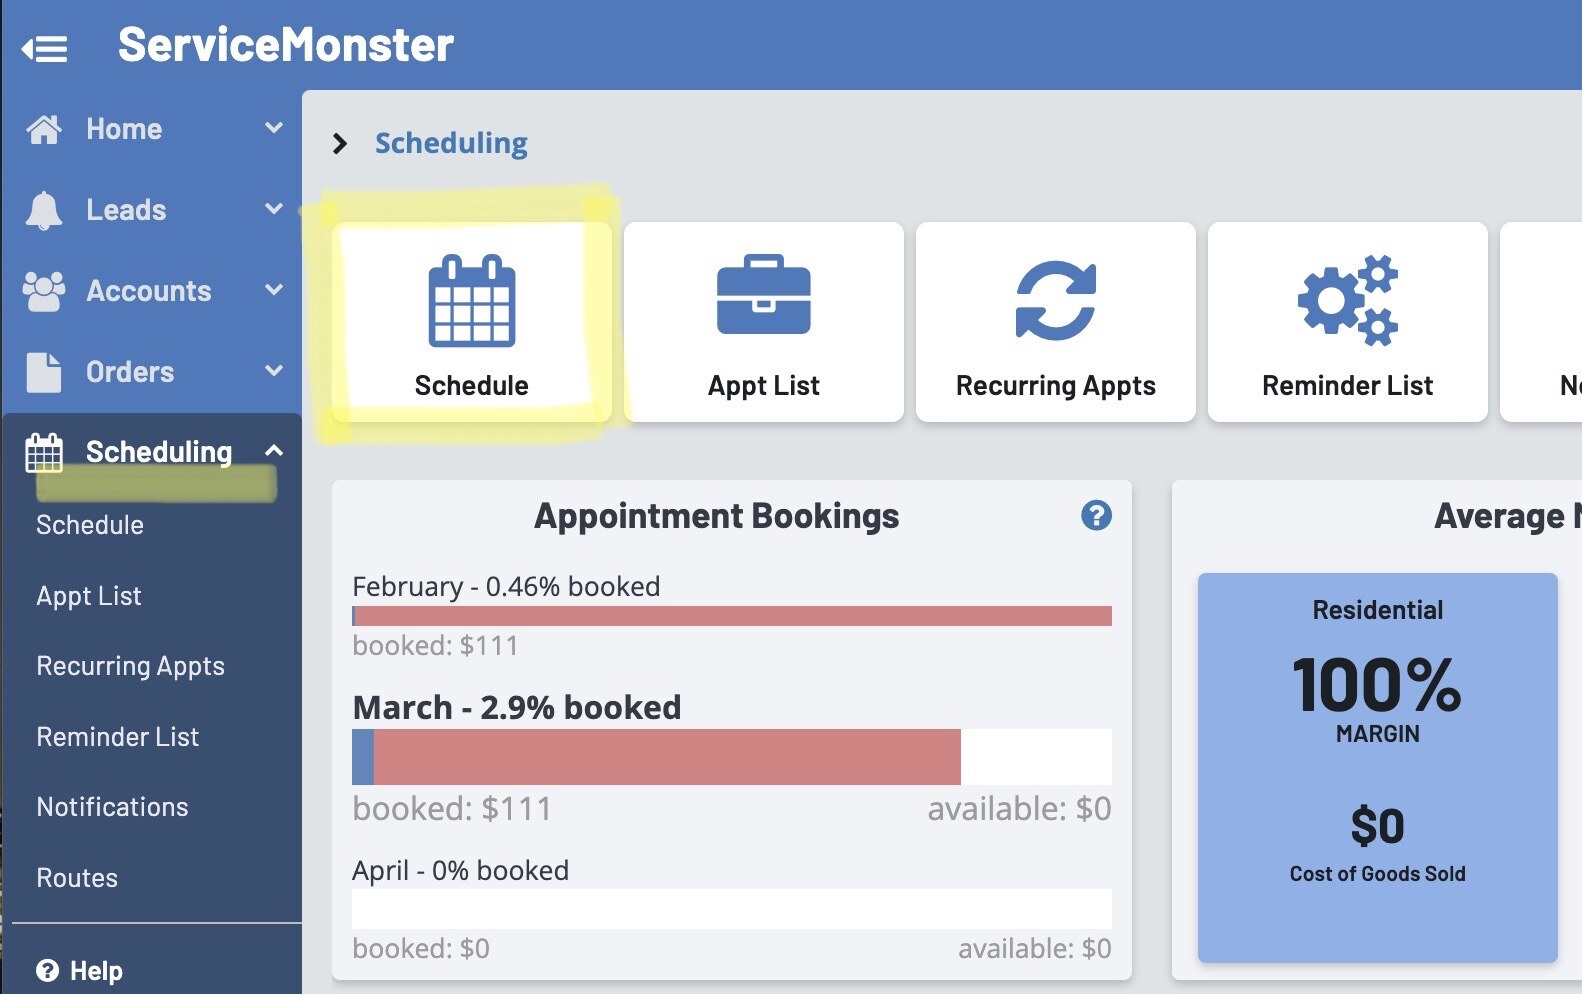
To set up your schedule, click on the "Scheduling" tab in the main menu, then select the "Schedule" icon.
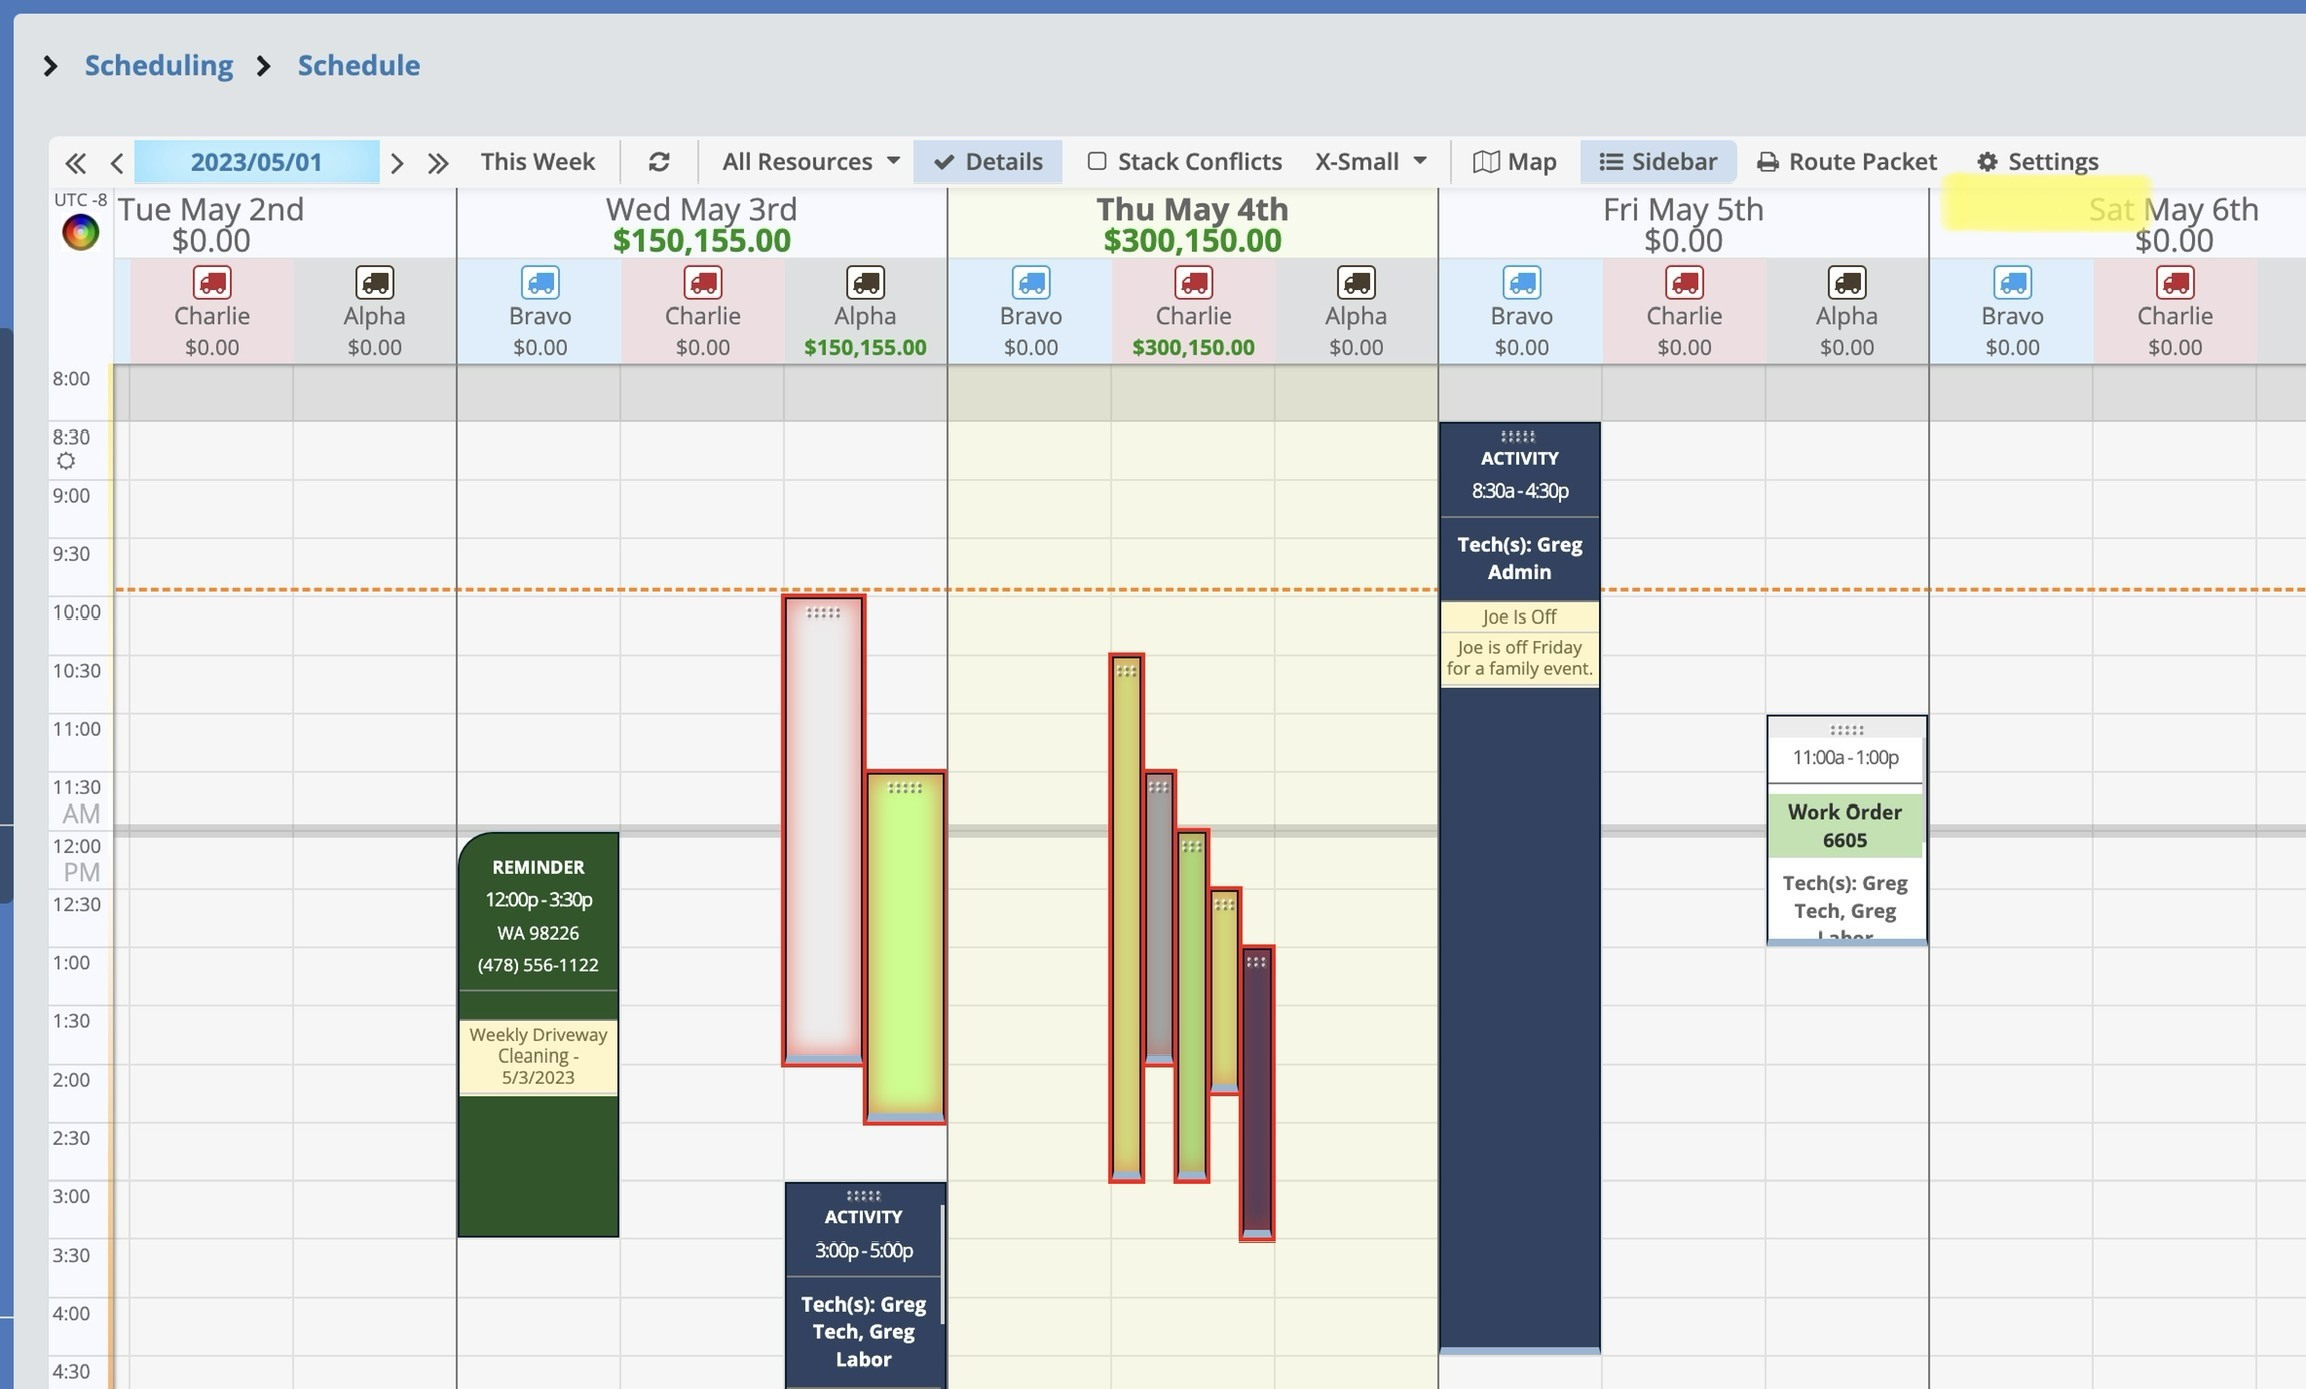
This is your schedule. You will be able to see your routes, as well as any appointments you have created.
From this page, our first step will be adjusting the Schedule Settings. You can do this by clicking on the "Settings" button on the far right side of the Menu.
Schedule Settings
In the Schedule Settings window there are five different tabs.
General
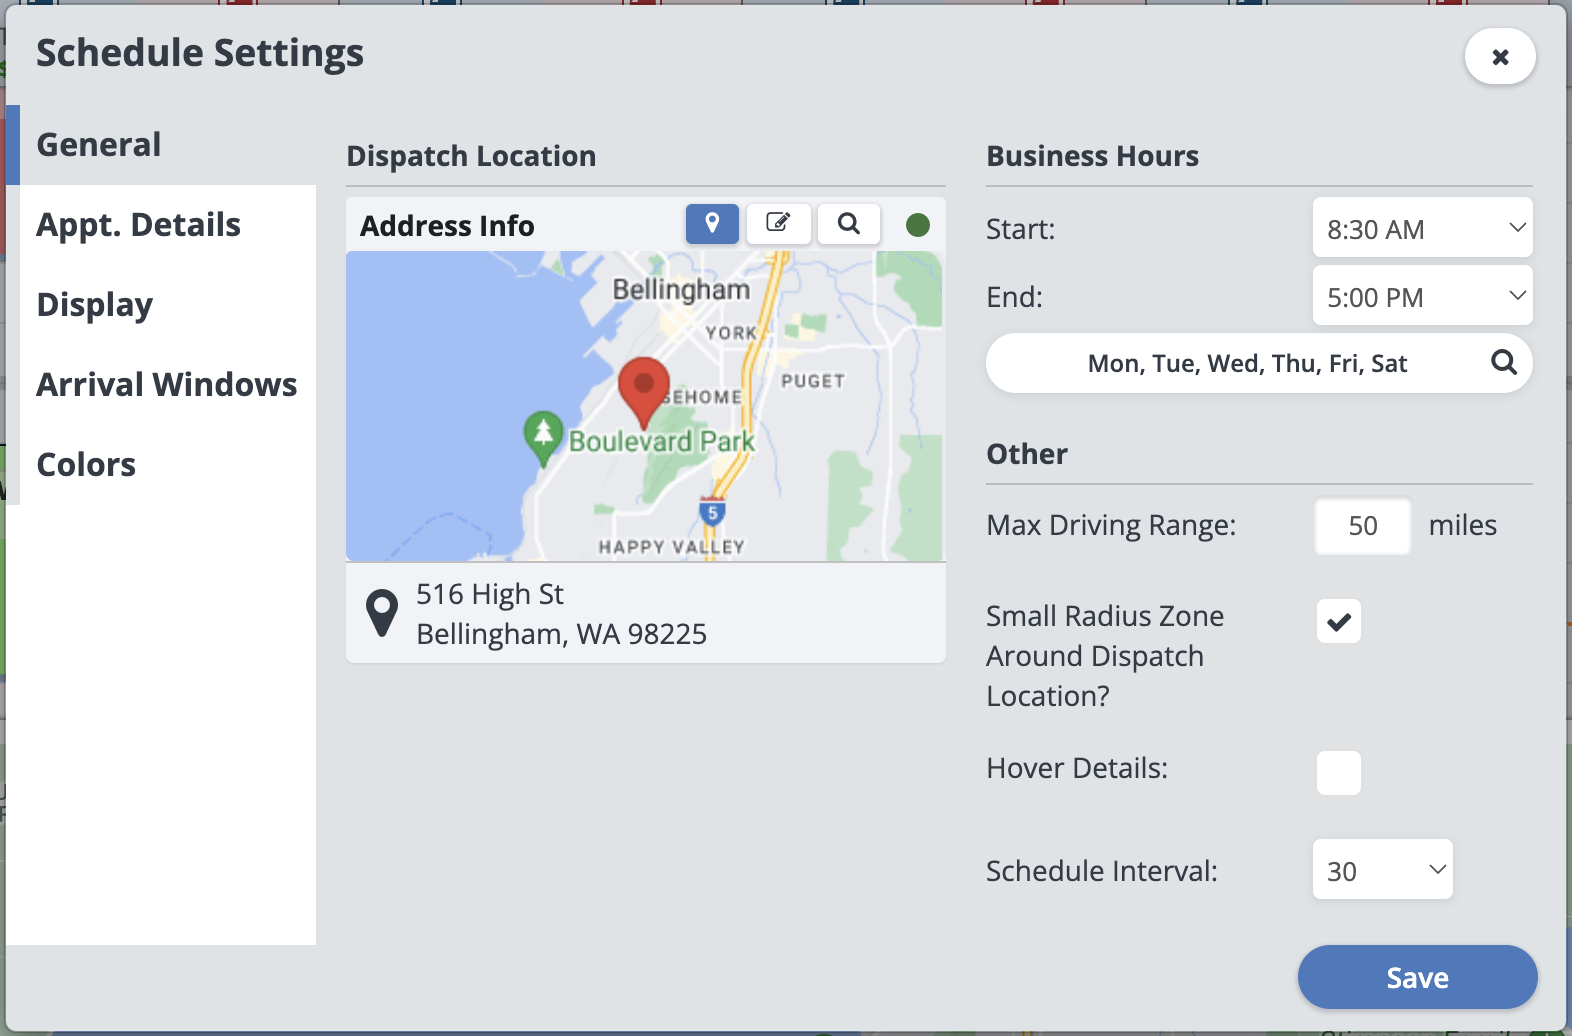
Dispatch Location: Using the Address Helper you can look up your dispatch location, this is the address you and your techs head out from everyday to do your jobs. Your clients will not be able to see this address. You will need a dispatch location entered into the system in order for our appointment color-coding to work (More on that in just a bit!). You can have one dispatch location per ServiceMonster account.
Business Hours End: The time you end work. Any time after this on the schedule will be grayed out.
Days Open: Days open will default to Monday - Saturday. Days closed will be grayed out on the schedule.
Note: You can still schedule on grayed out days if desired (overtime/etc).
Max Driving Range: The furthest you are willing to drive in one direction for a job.
Small Radius Zone Around Dispatch Location? If this box is checked then any appointments within the first 5% of your dispatch maximum driving range (The closest jobs to you) will be color coded gray.
Hover Details: If this box is checked, then you will be able to see the details of an appointment just by hovering your mouse over it.
Schedule Interval: You can choose if you want your schedule to be divided up in intervals of 30 minutes, or 15 minutes.
Appt. Details
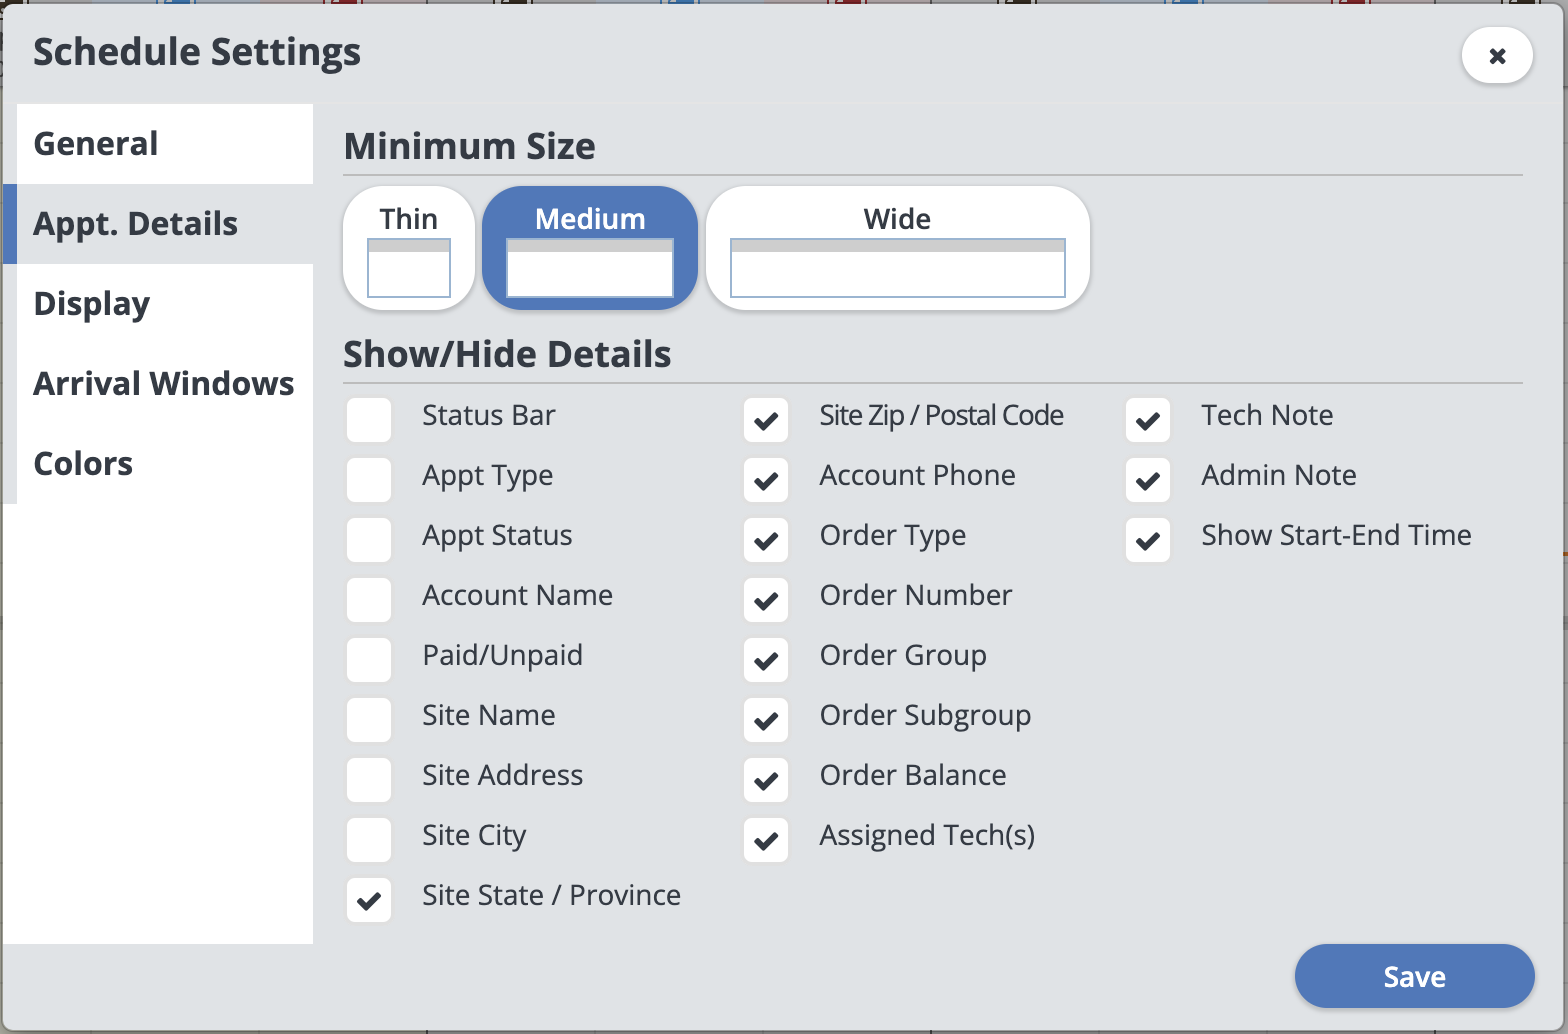
Minimum Size: Here you can choose if you want your routes to be Thin, Medium, or Wide.
Show/Hide Details: Choose what details you want to appear on your appointments on the schedule.
Display
Routes:
Here you can choose how you want your routes to appear on the schedule.

Sort Alphabetically: Sorts the routes in alphabetical order from left to right within the schedule.
Show Route Name: Toggles whether the route name shows at the top of the schedule.
Show Route Icon: Toggles whether the route icon shows at the top of the schedule.
Show Daily Route Totals: Select which primary value will be shown at the top of the route ("Selected Routes" or "All Active Routes"). "Selected Routes" means that you only see the route totals for what you are currently viewing. "All Active Routes" means that you always see the route totals for all routes/resources, regardless of what view you are currently viewing.
Show Per Route Totals: Toggles the total revenue from each route specifically to show under the route name.
Appointments/Activities: Here you can choose which display settings to show for the appointment/activity cards.
Show Warning If No Tech(s) Assigned: Toggles UI zebra/candy stripe effect if an appointment or activity does not have a technician assigned to it.
First Day of Week:
Here you can pick what the first day of the week will show up as on your schedule. You can pick between any day of the week or the current day.
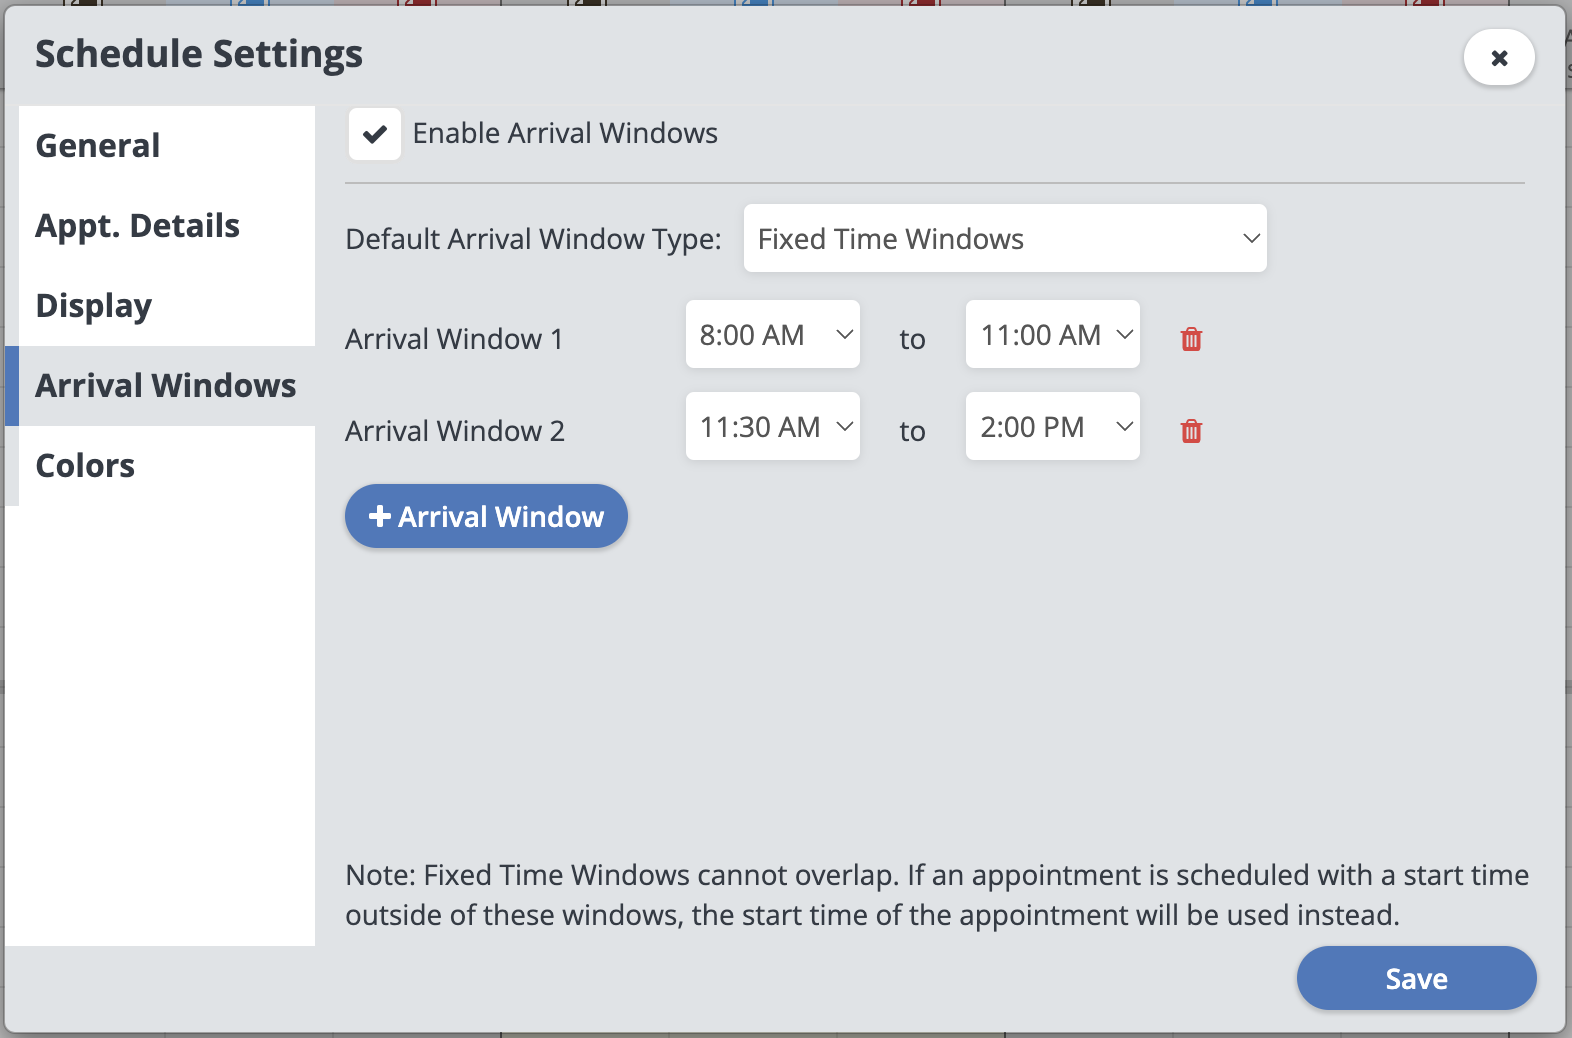
Arrival Windows
"Arrival Windows" are a Schedule Settings feature that allows you to create a time range for the expected arrival of your technicians rather than an exact time. This feature can give you more flexibility when scheduling to account for various delays throughout the day (addons/up sales, traffic, etc).
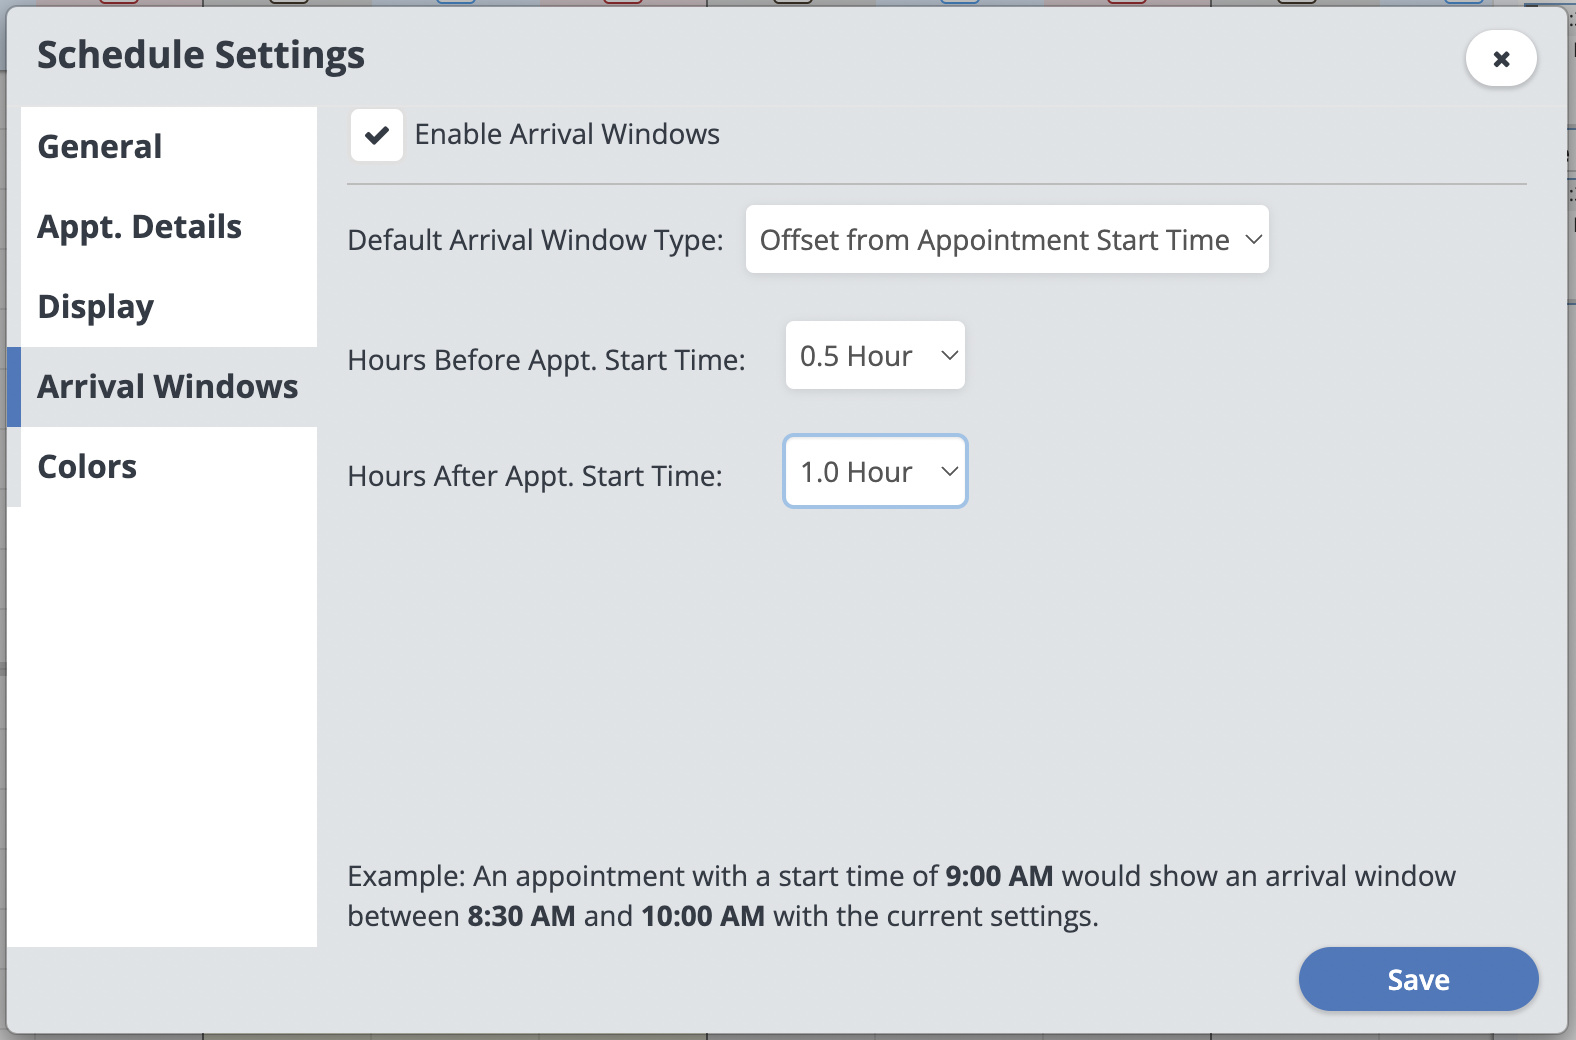
To use the Arrival Windows feature, first check the box at the top to “Enable Arrival Windows” and then select your arrival window type from the dropdown menu. There are two types of arrival windows you can select from the dropdown menu. One is called “Offset From Appt Start Time”, and the other is called “Fixed Time Windows”. Both of these are global schedule settings you can use to setup defaults for your company.
Click here for more information on Arrival Windows.
Colors
This is like a color coded compass! Think of your dispatch location as being right in the middle in the gray circle. Then, every appointment is color-coded around it. In this example my north-facing color is blue, which I chose because there is a large body of water to my north.
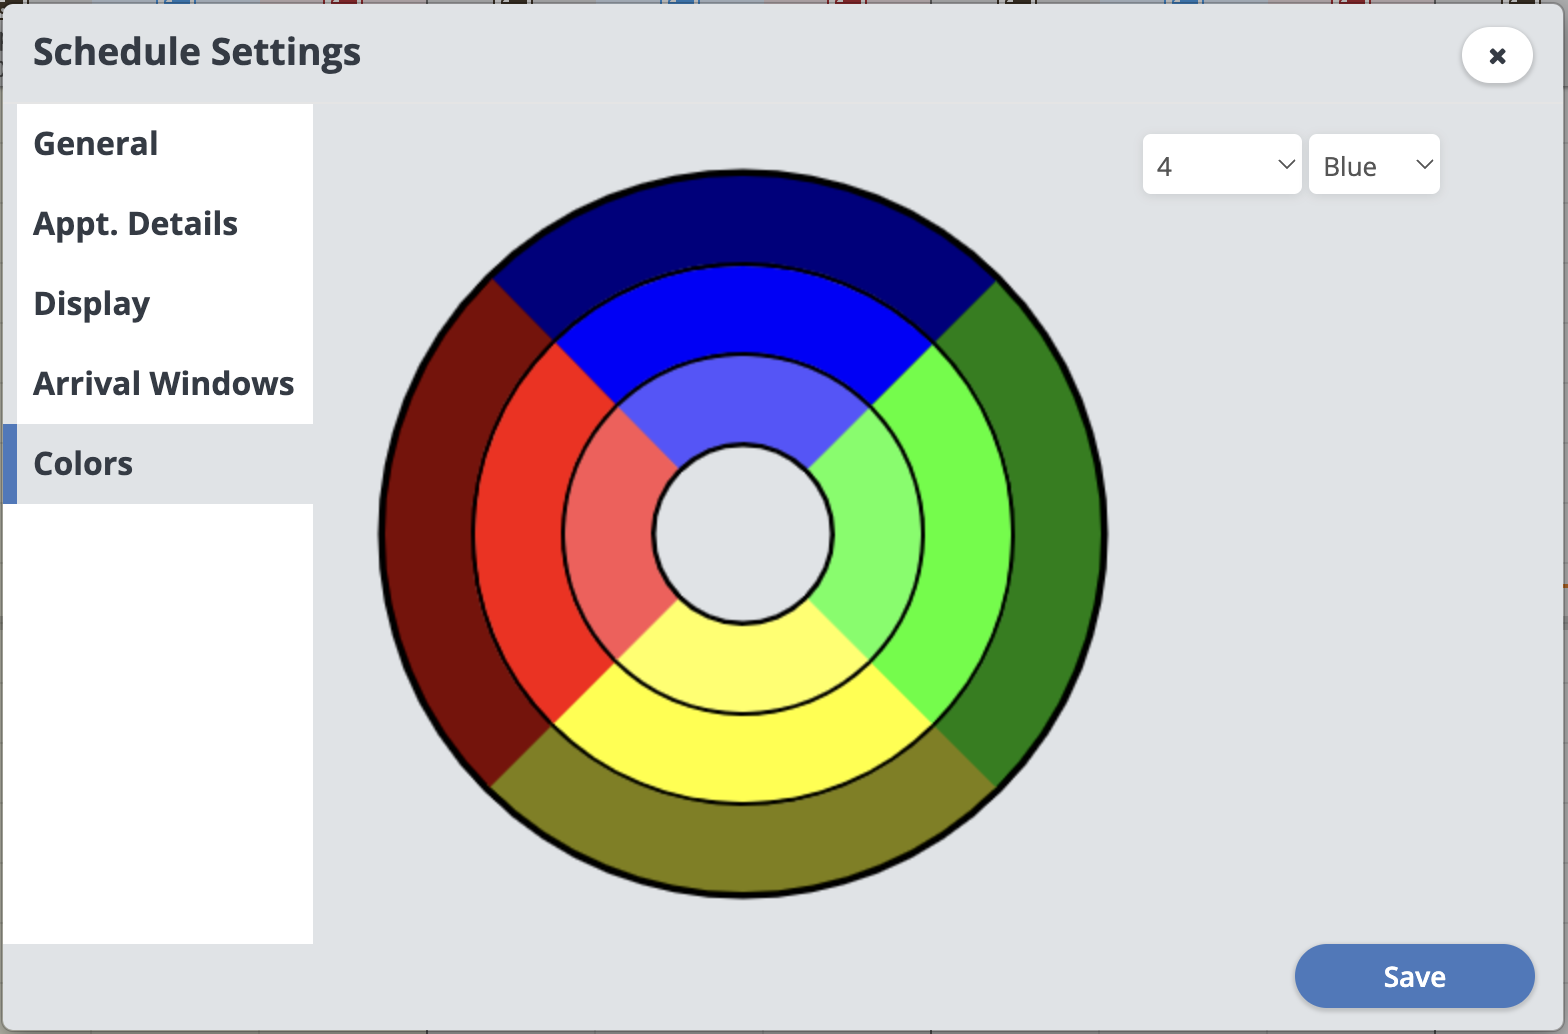
The color wheel is also split into thirds, radiating outwards, by distance. Using your Maximum Driving Range from the General tab, the lightest colors are with the first third of that driving range, the brightest are the middle third, and the darkest colors are the furthest away.
You can choose how many colors will appear on the wheel using the number drop-down list. You can also change which color is facing north by clicking on the color drop-down menu.
Click "Save" when you are finished.
Navigation Menu
At the top of the Schedule you have the Main Navigation Tools:

Month: Clicking this button will take you to the Month View. The system will remember the last used option (month/week) for each user when they navigate away and then back to the Schedule.
Week: Clicking this button will take you to the Week View. The system will remember the last used option (month/week) for each user when they navigate away and then back to the Schedule.
<<: Move back one month.
<: Move back one week.
Date: Clicking on the date will open up a calendar you can use to skip ahead on the schedule to whatever date you click on.
>: More forward one week.
>>: Move forward one month.
This Week: Clicking on this button will take you back to your current week.
Refresh: Clicking on this button will refresh the schedule.
All Resources: Clicking on this will open a drop-down menu where you can choose if you want to see all routes (All Resources), one specific route, or a specific group of routes.
Details: Clicking on this box will change if you can see all the details of the appointment right on the schedule, or just a plain color block.
Stack Conflicts: Here you can choose to stack your conflicting appointments so they overlap each other, or unstack your conflicts to show them side-by-side, shrunk down to fit within the route column width.
X-Small: Here you can pick how big the time increments on the schedule will look.
Map: Clicking this button opens and closes a map where you can see your Dispatch Location (red triangle), and the stops your Route will be taking for the selected day.
Sidebar: Clicking this button opens and closes the Sidebar on the right, where you can view your Routes and Appointments for the selected day.
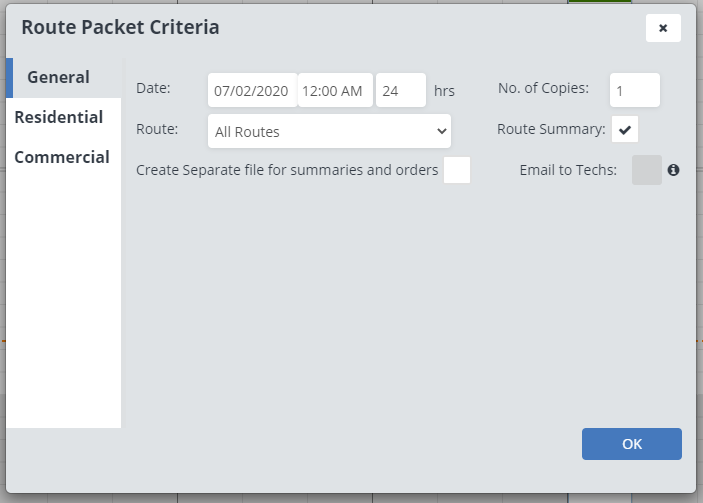
Route Packet: Clicking this button opens up the Route Packet Criteria where you can customize and create your route packets.
Settings: Clicking this button opens up the Schedule Settings where you can adjust all the settings for your schedule.
. Small Screen Appearance
The drop-down will contain the missing tools that are cut off from view. The Navigation Menu also has a "More Options" drop-down button that will appear if your browser window size becomes too small
Map
Clicking on the "Map" button opens up a map where you can see your Dispatch Location (Red triangle), and the stops your Route will be taking that day.
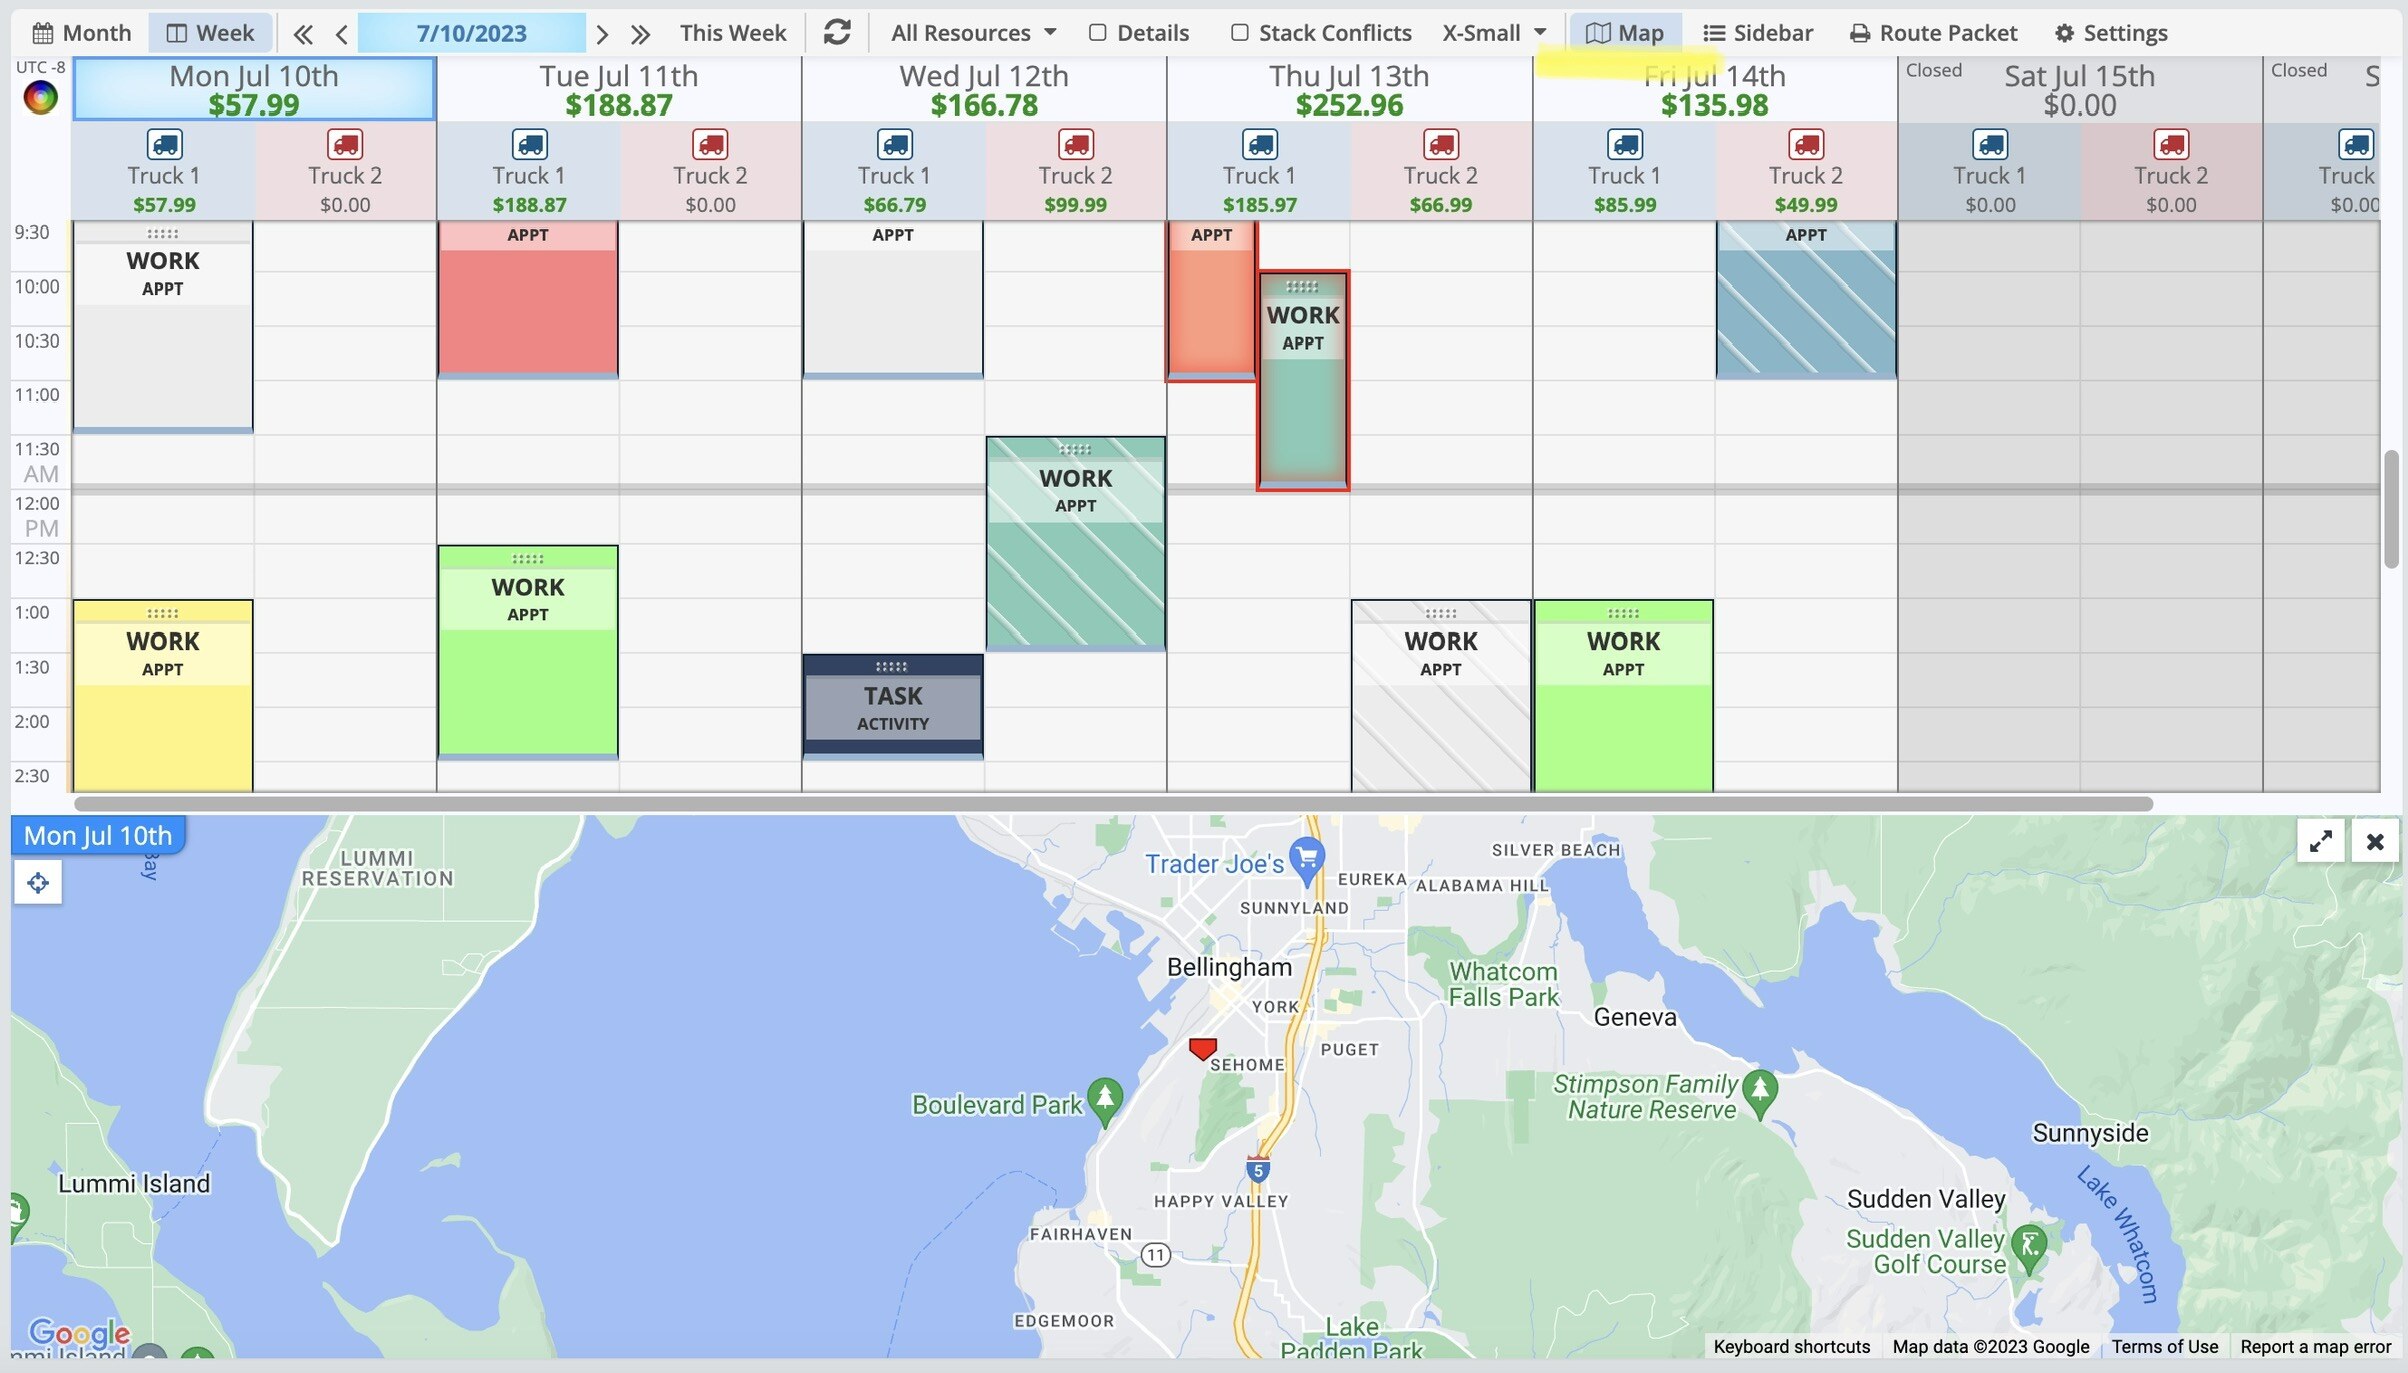
Appointments are marked with flags, and each Route is color-coded.
To change the day that you are looking at on the map, simply click on a day on the Schedule, then refresh the map.
Sidebar
Clicking on the "Sidebar" button opens and closes the Sidebar on the right, where you can view your Appointments, the On-Deck, and the Waiting list.

Route Packet
Clicking on the "Route Packet" button opens up the Route Packet where you can customize and create your route packets.